Exporting Your Cinematic to Video
Core Cinematics plays your shot back live in the game. To save that playback as a video file you pick one of two recorders.
Core Recorder
Our in-game recorder. Bundles FFmpeg, talks to the script over HTTP, supports long Rockstar Editor / EVE-style exports, motion blur, and real-time export. GPU window-capture by default (WGC) — same path OBS uses.
OBS Studio
The proven path. Free, GPU-accelerated, works on every machine. Use this if you want a stable, high-bitrate capture today.
Two different "recordings" — don't mix them up
- In-editor recording — captures vehicle/ped motion as data so you can replay them as puppets. Covered at the bottom of this page.
- Video export — captures the rendered image to an MP4/MKV. That's what Core Recorder and OBS do.
Want the best-looking export?
A strong PC plus a graphics overhaul like QuantV or NaturalVision Evolved will outclass any encoder setting. Lighting, depth of field, and texture quality come from the game — the recorder just preserves them.
Option 1 — Core Recorder
A standalone Windows tool that pairs with the cinematics script. Run the EXE, it installs FFmpeg the first time, and the script drives the encoder over HTTP — start, stop, frame pacing, motion blur, all controlled from the editor.
What it does differently
Long Exports
Frames are streamed and encoded as they're rendered, so multi-minute timelines (Rockstar Editor / EVE-style) don't blow up memory or RAM-buffer the way OBS does.
Motion Blur
Per-shutter accumulation blur applied at export — a real cinematic shutter, not a post-FX overlay.
Real-Time Export
Capture frames at playback speed — no offline render queue, you watch the file finalise as the timeline plays.
Auto FFmpeg Setup
First launch downloads and pins a known-good FFmpeg build. No PATH editing or codec-pack hunting.
Download
coreRecorder — latest release
Windows · GPU window-capture (WGC) + NVENC/AMF/QSV encode · pairs with Core Cinematics over HTTP
⚠ Read this before launching — the EXE is unsigned
The recorder is brand new and does not have a code-signing certificate yet. Windows treats every download from the internet as untrusted until you tell it otherwise. You'll hit two speed-bumps the first time:
1
Unblock the file (one click)
After unzipping, right-click coreRecorder.exe → Properties. At the very bottom of the General tab, if you see a checkbox labelled Unblock, tick it and press OK. This stops Windows from quarantining the EXE every time it launches.
2
Approve the SmartScreen warning
Double-click the EXE. Windows SmartScreen may show a blue "Windows protected your PC" pop-up. Click More info → Run anyway. The binary is clean — it's flagged purely because there's no signing certificate yet.
3
Run as administrator
Right-click coreRecorder.exe → Run as administrator. GTA V runs elevated for anti-cheat; the recorder must match or window capture goes black. To make it permanent: right-click → Properties → Compatibility → Run this program as an administrator.
Antivirus alerts
Some AV suites (Defender, Bitdefender, Avast) will flag an unsigned PE that talks over HTTP. If yours quarantines the file, add the recorder folder to your AV's exclusion list — or use OBS (Option 2) until we ship a signed build.
Stuttering or dropped frames? Disable these Windows settings
Even on strong rigs we see capture rate collapse when three Windows "helpers" kick in. They're designed to throttle background apps when a game has focus — exactly what coreRecorder is doing. Turn them off and capture stays smooth.
If recording stutters or drops frames
Three Windows settings throttle background apps when a game has focus. Turn them OFF before you record — coreRecorder will then capture at full rate.
1
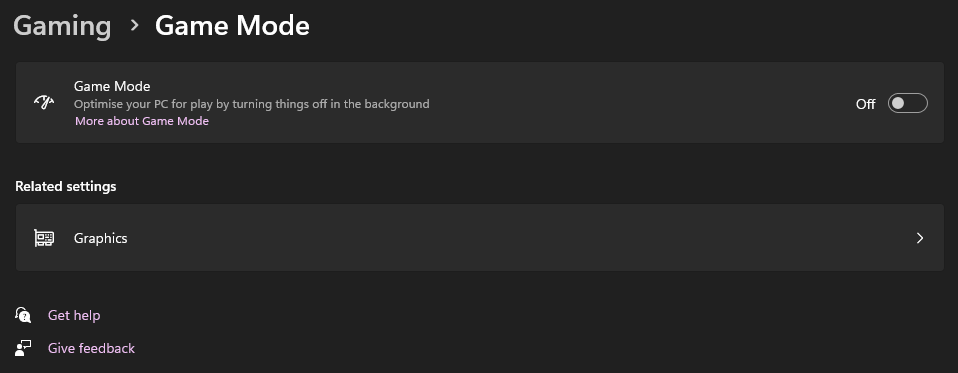
Turn off Game Mode
Settings (Win + I) → Gaming → Game Mode
Toggle Game Mode OFF.
2
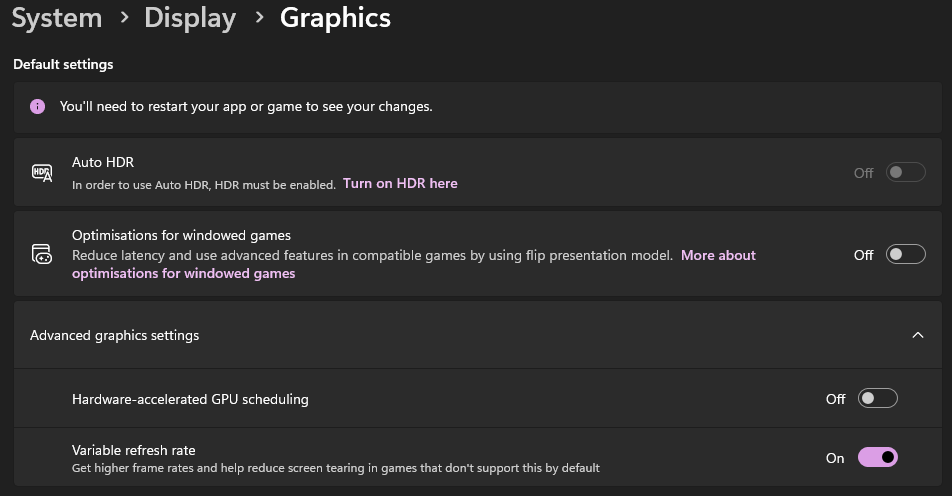
Turn off Optimisations for windowed games
Settings (Win + I) → System → Display → Graphics
At the top under Default settings, toggle Optimisations for windowed games OFF.
3
Turn off Hardware-accelerated GPU scheduling
Same page → click Advanced graphics settings to expand
Toggle Hardware-accelerated GPU scheduling OFF, then reboot your PC — it only takes effect after a restart.
With these three off and coreRecorder set to Run as administrator, capture rate stays locked while the game has focus.
How it works
1
Launch coreRecorder
Unzip and double-click coreRecorder.exe (as administrator). First launch self-installs FFmpeg into its own folder — give it a few seconds.
2
Leave it running in the background
It listens on a local HTTP port. No GUI is needed during capture — the editor drives it.
3
Open the editor in-game
Type /cinematics in chat. The export panel detects the recorder and unlocks the In-Game Export button.
4
Pick resolution, FPS, and shutter
Set resolution, FPS, and motion-blur shutter in the export panel.
5
Play your timeline
Hit play. Frames flow straight from the game to the encoder, and the finished MP4 lands in the recorder's output/ folder when the timeline ends.
Option 2 — OBS Studio
OBS Studio is free, open-source, and uses your GPU encoder. Pick this if you'd rather not run an unsigned EXE or you already have an OBS workflow you like.
Three things that matter most
Run as Administrator
GTA V runs elevated for anti-cheat. If OBS isn't elevated to match, Game Capture goes black or stutters. This is the #1 cause of broken captures.
Record as MKV
MKV writes each frame to disk as it's captured — crash-safe. MP4 corrupts on crash. Remux MKV → MP4 from OBS' File menu when done (instant, lossless).
60 FPS Minimum
Cinematic camera moves look choppy at 30. Lock GTA and OBS to a stable 60 FPS — only push 120 if your GPU can hold it.
To make admin permanent: right-click the OBS shortcut → Properties → Compatibility → check Run this program as an administrator.
Recommended settings
Output → Recording (Advanced mode)
| Setting | Value |
|---|---|
| Recording Format | mkv (Matroska) |
| Video Encoder | NVENC H.264 (Nvidia) · AMF H.264 (AMD) · QuickSync H.264 (Intel) |
| Rate Control | CQP |
| CQ Level | 16–20 (18 is visually lossless) |
| Keyframe Interval | 1 |
| Preset | P5 Slow / Quality (NVENC) · Quality (AMF) |
| Profile | high |
| Look-ahead / Psycho Visual Tuning | On (NVENC) |
Video
| Setting | Value |
|---|---|
| Base & Output Resolution | Your native (e.g. 1920x1080), matched |
| Downscale Filter | Lanczos |
| Common FPS | 60 |
Sources — Add a Game Capture source (not Display/Window):
- Mode:
Capture specific window→[GTA5.exe]: Grand Theft Auto V - Anti-cheat Compatibility Hook: On (required for FiveM)
- Capture Cursor: Off
Audio: 48 kHz · Stereo · 320 kbps AAC.
CBR fallback bitrates
If CQP isn't available on your encoder, switch to CBR: 1080p60 → 50 Mbps · 1440p60 → 80 Mbps · 4K60 → 150 Mbps.
Color range
Set YUV Color Range to Full only if your editor supports it (Premiere, DaVinci, After Effects do). For CapCut and consumer tools, keep it on Partial to avoid crushed blacks.
In-Editor Recording (data capture)
Separate workflow — this records vehicle/ped motion as data, so you can replay it later as puppets on your timeline. The video export above is what turns that puppet replay into an MP4.
1
Start Your Export First
Arm Core Recorder (or hit record in OBS) before anything else. A few seconds of pre-roll is free; missing the intro isn't.
2
Open the Editor
Type /cinematics in chat to open the editor.
3
Configure the Recording Panel
Click the Recording panel. Choose your targets:
- Vehicles — every vehicle within
RecordRadius(default 150m) - Peds — every human ped within radius, including the player
Adjust RecordRadius in config.lua.
4
Start the Recording
Click Start Recording. The editor closes so you can drive or act. Chat alternative: /cinematics record.
5
Drive / Act the Scene
Drive, walk, fire — every frame of position, rotation, velocity, steering, RPM, handbrake, horn, weapon and aim state is captured.
6
Stop the Recording
Press BACKSPACE (or Config.RecordingStopKey) to save. Chat alternative: /cinematics stop.
You'll see: Saved N vehicle(s), M ped(s) — Ts.
7
Build Your Shot
Re-open the editor. Recorded entities appear as replay puppets. Add keyframes, position the camera, pick an interpolation mode.
8
Play Back & Export
Press Space to play back. The puppets re-enact, the camera sweeps, and your recorder captures the result.
Tips for Better Shots
Lock the World
Use the World & Scenery panel to freeze time of day and weather. Stops the sun moving mid-shot and keeps lighting consistent across takes.
Ease Into Shots
Set first and last keyframes to 'Ease In-Out'. A camera that starts and stops at full speed feels robotic — ease curves give it weight.
Cinematic Mode
Interpolation → Cinematic with Tension ~0.5 is the trailer-shot look. Spring adds overshoot for bouncy energy.
Three-Angle Rule
Three well-framed keyframes around one subject beats ten random ones. Make every camera see the subject.
Scout in Preview
Use /cinematics preview to watch the camera prop glide the path without opening the editor — great for framing before the final take.
Use a Graphics Mod
QuantV or NaturalVision Evolved transform export quality more than any encoder setting. The recorder only preserves what the game renders.